
2 Vampire, Ha Ha Ha
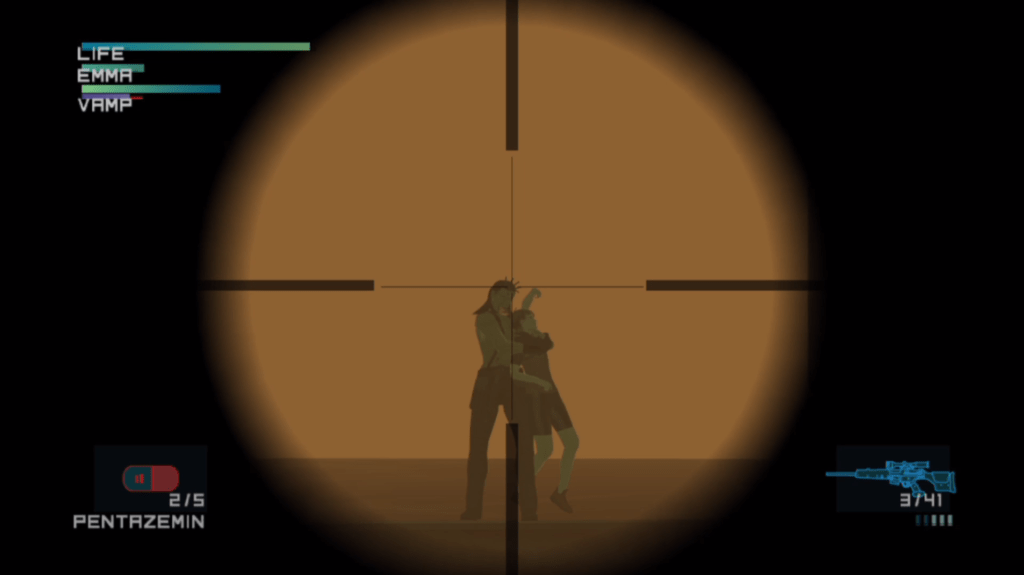
After successfully escorting E.E at the oil fence, Vamp once again rears his ugly head and grabs E.E, taking her hostage. I’ll be referring to this encounter as Vamp 2. This part right here is where my sanity would slowly begin to fold in on itself. While Vamp is holding E.E hostage, her health will drain. When it reaches zero, E.E of course dies, and that means a game over. Failing here would mean having to redo Vamp 1, the swimming and the entire slow escort mission again. Success would mean progress. Did I succeed? Well, remember how I just spent a whole paragraph explaining why I don’t like the sniping in this game? This is why.
I simply could not line up my shots with Vamp consistently. I tried, I really tried, but the fiddly aiming controls made trying to hit Vamp an absolute struggle that still haunts me. When Vamp 2 begins, Raiden is automatically lying down on the floor and you can try to get a few good shots on Vamp from there. Unfortunately, there are not enough bullets in the sniper to take him down from the starting spot, which means a short run to the respawning ammo box.
Any time you spend not shooting Vamp, E.E’s health will drain. I should also mention that her health from the initial walk across the oil fence determines how much of it she has going in this part, so you basically need to do all of that flawlessly and make sure she doesn’t take too much damage to even stand a chance here unless you’re some sort of sniper rifle savant.
I failed so many times here, and every single time, I’d have to redo everything from the Vamp 1 save. As you can imagine, this got old incredibly fast and I was getting sick of it. I didn’t want to fight Vamp 1 again. I didn’t want to do all that swimming. I didn’t want to slowly lead Emma all the way here just do I could fail again.
It was at this point that I made a choice: I was going to reload Save 4 and redo the Harrier and all its subsequent sections, but instead of making Save 5 at Vamp 1, I would push on further and make a newer, better Save 5 at the sniping section. That way, if I failed here (which I would, naturally) I wouldn’t have to endure any more of that.
Redoing the Harrier was easy enough. I knew what I was doing, and within half an hour or so, I’d made my new, shiny, far better Save 5. After a few more aeons of trying to take out Vamp 2, I finally did it! Letting out some sort of unintelligible shriek of victory, I went on my merry way, taking great pleasure in knowing I wouldn’t have to do that again. There was a bit more walking to do, but Big Shell was practically empty now and I would soon be at Save 6. I was back on track and ready to crack.
Unfortunately, something terrible happened.
In the very next room, I somehow ran into the ONE guard that had stayed behind. How did this happen? I guess I was so ecstatic about finally putting Vamp down that I’d thrown caution to the wind and wanted to reach Save 6 as soon as possible. I had no intention of redoing Vamp 2, so I made an emergency panic save, creating Save 6 right there, earlier than intended.
This meant that I’d have to do the next part with a little bit of extra room traversal on top. It was fine. It would be fine, right? Knowing the potential misery that lay ahead, I was hit with the sad realisation that I would have to beat Vamp 2 again. Save 5 was still intact, so it wasn’t like I’d have to do a giant trek again, but the thought of redoing the sniping section made me wince. Sucking up all of my bad thoughts and cracking my knuckles, I did it. I finally made it to Arsenal Gear, making a much better Save 6 this time.
Part 4: Up Your Arsenal

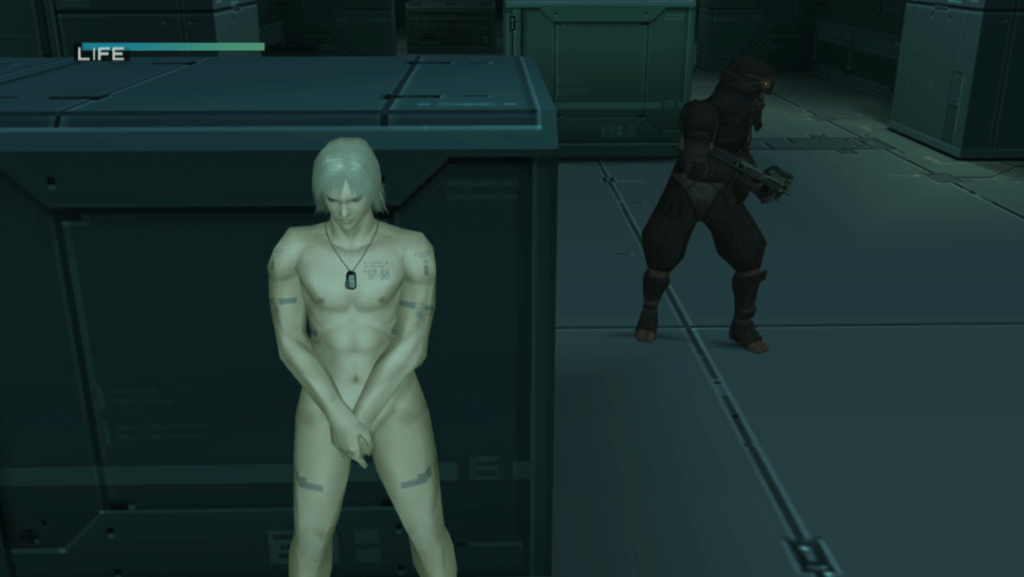
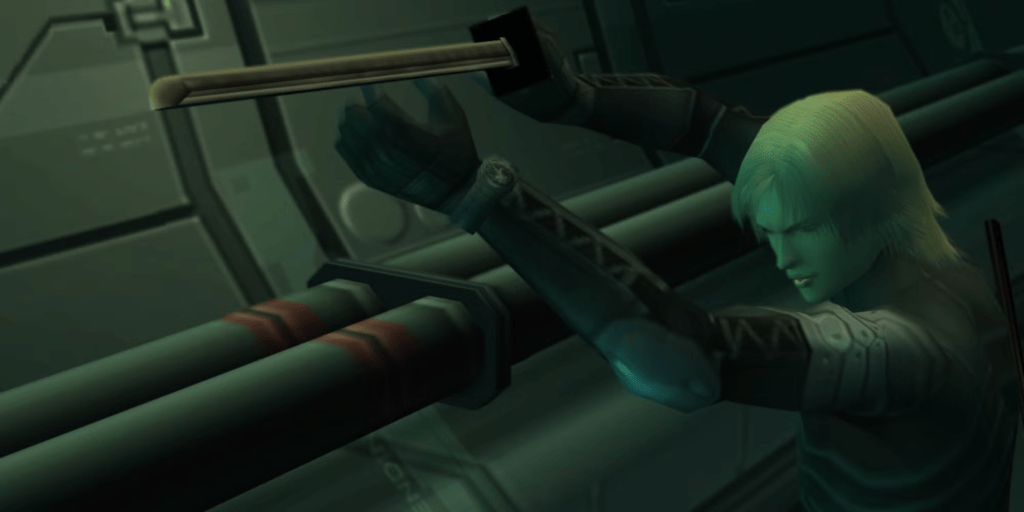
I was ready. It was time for the final stretch of the game. The end was in sight. Arsenal Gear contains the game’s pivotal moments, the absolute mindfuckery that’s still talked about today. As for the gameplay of this particular section, I basically had to sneak around, bollock naked past some guards and then run up and down a corridor skipping through weird codec calls until Snake shows up to give you your clothes back and also a sword. Cool. Following that is about a minute of waiting (which can be used for practising swordplay) and then the Tengu fight.
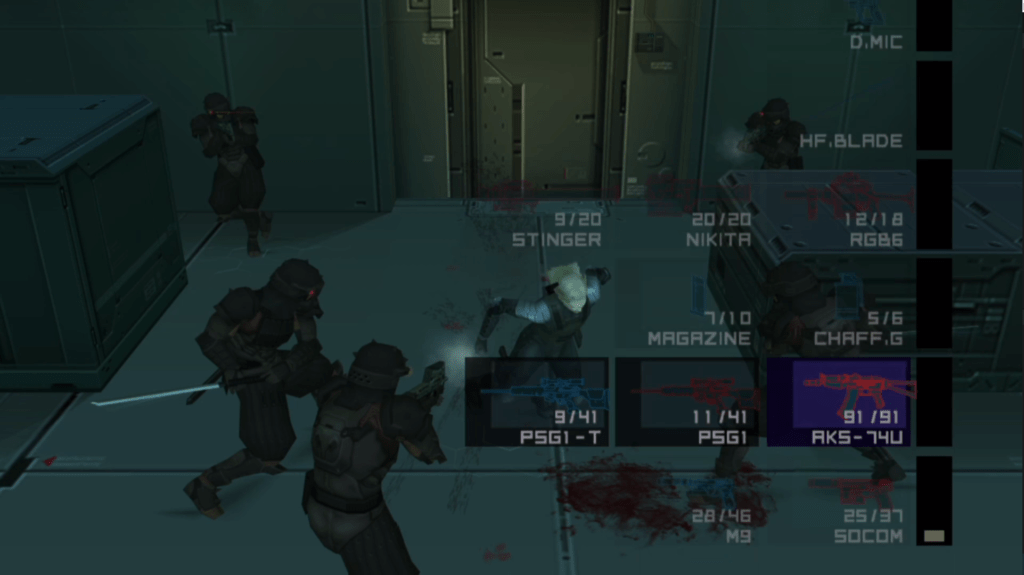
The Tengu fight is split into two sections, known as Tengu 1 and Tengu 2. This fight was rough. Raiden and Snake finally team up to take on what feels like an entire army of very cool-looking, heavily armoured high-tech soldiers known as the Arsenal Tengus. Even with body armour equipped (thank Kojima I’d remembered to pick that up), Raiden still takes a lot of damage, and being absolutely swarmed by soldiers armed with machine guns and swords means you should be prepared to eat shit. I did eat shit. Lots of shit.
Fortunately, both Tengu 1 and Tengu 2 have exploits you can perform in order to skip large portions of them. The Tengu 1 skip involves running to the exit of the room (which isn’t normally supposed to open yet) and performing an advanced manoeuvre that clips you straight through the door, and into Tengu 2.
The problem is, there’s a metric shitload of Tengus between you and that door. The most effective method is to simply toss stun grenades, but these need to be thrown at incredibly precise times and locations in order to work properly. If you were to make it this far without any stun grenades, this skip would not be possible, so I’m forever thankful that I did so.
Naturally, I died many, many times attempting this skip. Each failure meant redoing the naked parts and sword tutorial again and again and again. On a few occasions, I did manage to make it through to Tengu 2, but I could not pull off the skips in there at all. One method involves dragging a guard into a corner, and the other involves knocking Snake out and then spraying people with coolant. I could not do this, so I resolved to complete it legitimately, and the next few hours were spent trying and failing to get through this gruelling gauntlet.
After a few more attempts (by a few I mean a lot), a thought began to creep into my head. It was a nasty thought, a bad thought. It was an idea, a horrible idea. Something I really didn’t want to do, but with every passing failure seemed more and more likely to help ease my pain and nudge me further on my path to eventual success…
Bisexual Begins Again
I would have to redo Vamp 2.
I didn’t particularly want to do the sniping part again after already beating him twice. The thought of doing that again made me wince. It sucked. Not a single fibre of my being wished to revisit Vamp 2, but the Tengus were proving to be such a roadblock that I began to seriously consider it.
If I could beat Vamp 2 again, make it to Arsenal Gear, do the naked part and make a better Save 6 at the beginning of Tengu 1, then any further attempts at the Tengu fight would at least let me jump straight back into the action. So it was, with possibly the biggest, saddest sigh of the run that I went back and did Vamp 2. Again. For the third time. I actually beat him on my first attempt this time, which was nice. Very nice.
I was well on my way to getting that cushy Save 6 that I so desperately desired, and all seemed well. Things were back on track, and I was happy again. All was right. That is, until I got spotted during the Arsenal sneaking section, and I felt my soul deflate a little. If I wanted to push forward with my goal, I would have to beat Vamp 2 a fourth time.
People say this fight is easy. They say it’s not hard at all. I am not one of those people, and by the time I’d popped Vamp in the head for the fourth and hopefully FINAL time, I was really feeling the pressure. I did not wish to do it again, so it was with incredibly clenched arsecheeks that I successfully made it back to Tengu 1 and saved the game so fast that it’d Sonic blush. I finally had my ultimate, definitive Save 6. I had three fights left in the game, so I had to lock in and see it through. I would earn that Big Boss rank.
Part 5: You Are Above Even the Boss
Placing Save 6 at the start of Tengu 1 definitely proved to be the right choice. Though I was still dying a lot (I really mean a lot), being able to just immediately throw myself straight back into the action cut down on the time spent significantly. If I died, I’d be right back in about 30 seconds compared to the three or so minutes I was having to do before.
Eventually, through sheer repetition and muscle memory, I was able to somewhat consistently do the Tengu 1 skip and make it through the door, but Tengu 2 still proved to be an issue. I could not pull off any of the Tengu 2 skips at all, so I had to just knuckle down and do it the old-fashioned way. Snake is an absolute machine at mowing the Tengus down and honestly does most of the work himself, so all I really had to do was run around the room holding my sword in a block stance, occasionally taking out any enemies that Snake had yet to kill.
Here is where I feel it’s best to mention that MGS2 has a bleeding mechanic. Your health will slowly and continuously decline after it reaches a certain threshold. The way to stop the bleeding is to either use a bandage or simply crouch down. This will not only stop the bleeding but also restore your health up to a certain point. It won’t completely heal you, but it can mean the difference between failure and success if you can spare a moment during a fight to recover. I used this a lot here.
After what felt like an absolute eternity, the screen finally faded to black, and the next cutscene played. I let out a triumphant cry. I’d been stuck on the Tengu encounter all day, and making it this far had awakened the warrior’s spirit within me. I hadn’t finished the game yet, but I’d got past the Tengus. Just two bosses to go, now. I was about to make Save 7, and the end was in sight.
RAY of hope
Save 7 was the Metal Gear RAY(s) fight. I’d heard plenty of stories about this boss. I’d heard how difficult it was. I’d heard of how it was a gruelling encounter that truly pushed the player to their limits. This boss tasks you with destroying 20 Metal Gear RAYs, which lasts around 10 or so minutes. Since these buggers can one-shot you if you’re not careful, this means having to maintain a very high level of concentration throughout the entire fight. One single slip-up can doom the attempt, wasting minutes of progress, so there was no room for error.
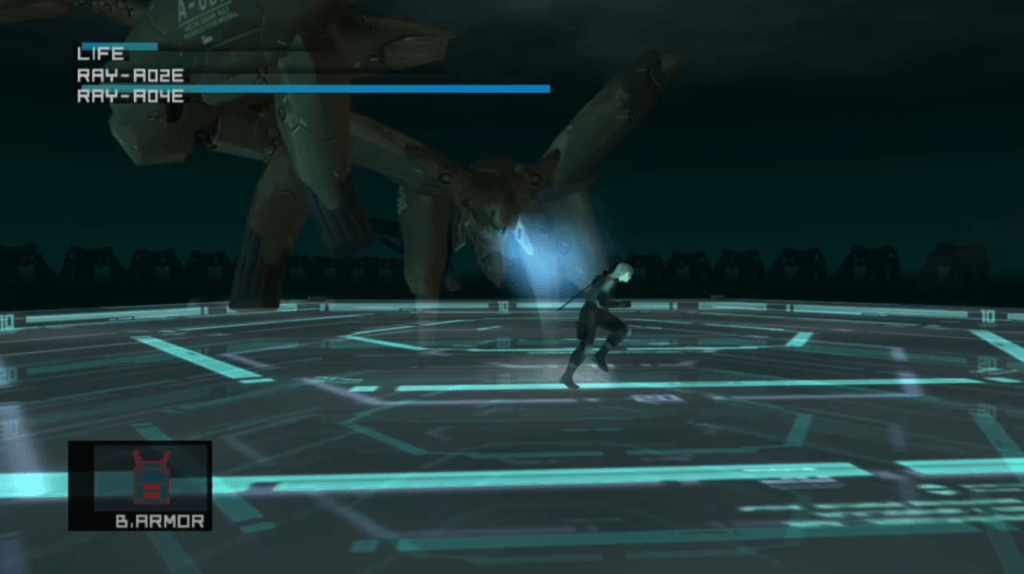
Funnily enough, though, despite the tales of terror that had led me to expect the worst, I didn’t find it THAT bad. I’m not saying the fight was easy, but after enough repeated attempts, I did gain a greater grasp of how the RAYs worked. It was just a case of fighting one on the platform, quickly shooting them in the leg and then the head with the Stinger missile, baiting out the attacks that are easy to avoid, repeating step 1, dodging whatever the 2 RAYs in the background might throw at you, and basically doing that until you destroy 20 of them.
It seems like a lot. And it is. At some point, though, I entered some sort of Zen-like state where I could easily anticipate and react to everything they threw at me and absolutely demolish them with the Stinger. With the RAYs defeated, it was time for Save 8, and I had one final choice to make.
Following the RAY fight, you are prompted to save the game. I had to really think about this, because there were just two hurdles left until I achieved the Big Boss rank: the infamous torture sequence and the Solidus boss fight. Following Ray, the game asks if you want to save here. If I were to save here when prompted, my RAY victory would be immediately preserved, but I would have to do the torture and Solidus fight in one go.
I was aware that the button-mashing requirement to pass the torture sequence had been toned down from the finger-numbing experience of ye olde original PS2 release, but I still wasn’t entirely sure if it would be so easily done, and if I were to fail, it would mean having to fight RAY again.
Final Boss
I took a few minutes to make my choice, and ultimately decided to just try and do the torture sequence and make my final save on Solidus. With shaky hands still pumping from the RAYs, I mashed that triangle button like my life depended on it and discovered with glee that it was indeed significantly easier than what it used to be. Phew. I was able to pass the sequence without too much effort, and after skipping the following cutscenes, I finally made it to Solidus, the final boss. It was time. Time to finally finish Metal Gear Solid 2‘s Big Boss run. Time to make Save 8.
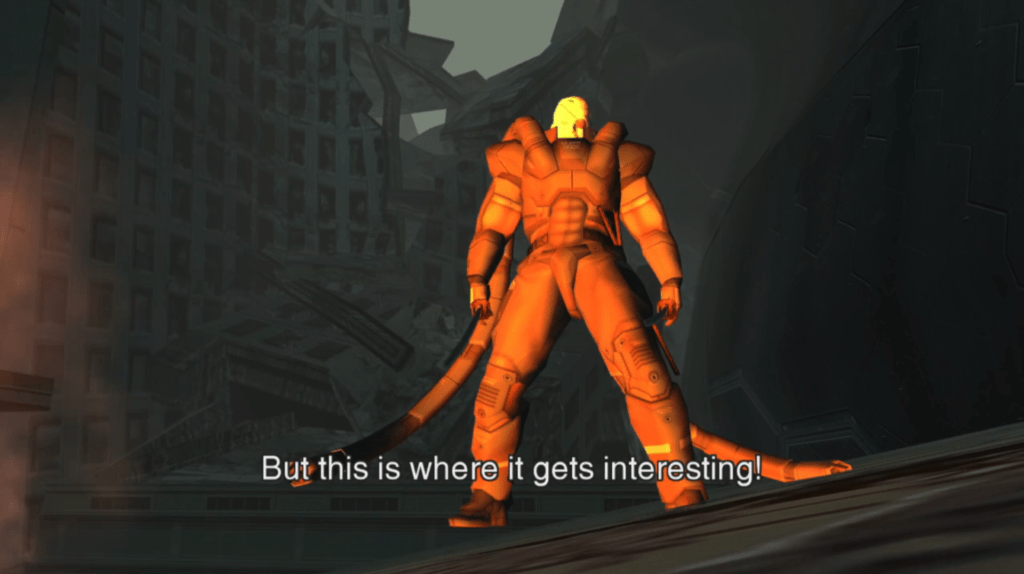
Solidus was intimidating. He has a few different attacks, and the fight is split into two phases. Phase 1 lets him attack with his tentacles, using them to either flop around or fire rockets towards me that were a bit annoying to avoid. In addition, he can zip around the rooftop, leaving a fire trail behind him that can easily burn Raiden and leave him with a burn that drains health until it’s put out.
Unfortunately, your health does not recover after the previous torture sequence, so whatever health you had left is carried over into the Solidus fight. I was fortunate enough to have enough health that allowed me to take about two hits before dying, but the crouch healing method I mentioned earlier also comes in very useful here if needed.
After taking enough damage, the second phase of the fight begins, where Solidus sheds his tentacles and becomes a lot more aggressive with his physical attacks. This looks scary, but like with the RAY fight just before, something just sort of clicked in my brain. This was the final part of my Big Boss run, and I was locked in, motivation driving me to win.
My successful run saw me absolutely dunking on him with no error, and when I cut off that last little bit of his health bar, I was ecstatic. I was victorious. I had finished the run, and the Big Boss emblem would be mine. At least in theory, anyway, because I still had to sit through some unskippable cutscenes and the end credits, which all eat into the playtime.
Based on the stats I had been seeing throughout the run, I was confident I would do it. I hadn’t killed anyone, I’d got no Alerts outside of mandatory ones, my ammo count was about 600 following RAY and my damage total was well below even the halfway mark. I’d satisfied the requirements, but couldn’t shake the uncomfortable possibility that something along the way could have gone wrong without my notice, and I was going to see a different rank on the results screen. I sat through the credits with nervous anticipation, and when the results screen finally came on, I held my breath until I saw it.
Kept you waiting, huh?
Right there, in all its pixelly red glory, was the Big Boss emblem. I had done it. After hours, days of repeated attempts, probably hundreds of deaths, going through the same areas so many times I could do it with my eyes closed, I’d unlocked the Big Boss emblem. My sheer unbridled joy at seeing that little image saw me shrieking wildly at the screen; I’d finally done it. I hadn’t yet earned the platinum, but everything else was simple in comparison.
Achieving Metal Gear Solid 2’s Big Boss rank felt like some sort of spiritual, religious awakening. By making it through this absolutely Sisyphean task, I felt like I had ascended to another plane of existence. Hours upon hours spent in the game granted me an intimate familiarity with MGS2’s inner workings. I felt like Neo in the Matrix, having gained the powers of The One and the ability to bend it to my will.
There’s a special kind of satisfaction to be found in mastering something like this and though the journey to that final results screen was fraught with failure, rage and sheer annoyance, it was all worth it because I emerged on the other side as not only a better player, but a better person. I learned the value of dealing with seemingly insurmountable walls and the frustration that inevitably comes with it, and I learned how to keep calm under pressure. Most importantly of all, I learned how to simply bask in the immense joy of getting to watch Vamp fall into that ocean over and over again.
I invite you to bask in my profound radiance in Discord or YouTube. Consider reading this article about the effect of real-life supervillains on everything we hold dear.

Sean Hollyman is an avid fan of action figures, videogames and sometimes other things too. When he's not labourously trying to earn platinum trophies for games that he otherwise probably wouldn't care about, Sean can often be found taking photos of his Transformers in embarrassing situations.
Favorite Food: Roast Dinner
Least Favorite Food: ANYTHING with mayonnaise in it


Post Comment